
- MapPress
- Compatibility and Installation
- Picking a Mapping API
- Mapbox and Leaflet
- Google API Keys
- Geocoding
- Creating a Map
- Create a Map with the Gutenberg Block Editor
- Create a Map with the Classic Editor
- Editing a Map
- Shortcodes
- Map Sizing
- Marker Clustering and Spiderfying
- Template Tags
- Backing Up and Copying MapPress Data
- MapPress Pro
- Reference
- Frontend Forms
MapPress
MapPress adds interactive maps to WordPress posts and pages. The free version includes unlimited maps and markers, free keyless maps or Google Maps, directions, KML/GPX files, clustering and map blocks. MapPress Pro adds store locators, search, filters, custom icons and more. See all features and live demos.
Compatibility and Installation
MapPress requires WordPress 6.3 or higher and PHP 7.0 or higher. See the Installation Instructions for information about installing the plugin.
Picking a Mapping API
MapPress supports two mapping APIs:
Leaflet (default)
- Free, with no API key and no billing account
- Uses free OpenFreeMap tiles (OpenStreetMap data) by default, or Mapbox tiles with a Mapbox access token
- Displays markers, KML/GPX files, lines and shapes
- Traffic, bicycling and transit overlays aren’t available, and lines and shapes can only be drawn in the map editor with the Google engine
- Very accurate geocoding and familiar-looking maps
- Requires an API key and a Google billing account; free usage is limited
Live demo: OpenStreetMap (Leaflet) · Google Maps
Mapbox and Leaflet
Leaflet maps use OpenFreeMap tiles by default. OpenFreeMap is free, needs no API key, and renders detailed vector maps from OpenStreetMap data, including a dark theme.
You can also use Mapbox, a paid service with a generous free tier, which provides:
- Its own map tiles
- An accurate geocoder
- Custom styles created with Mapbox Studio
To use Mapbox, get an access token, enter it in the MapPress settings, and select Mapbox as the tile service. For sites with heavy traffic the charges for map tiles and geocoding can be substantial.
Google API Keys
Google Maps require a Google API key. Click the link to learn how to create one:
Get A Google Maps API Key
For Leaflet maps, no API keys are needed, unless you’re using the Google geocoder.
Google API key issues
If maps aren’t displaying after entering the API key, check the browser’s JavaScript console for any errors (F12 for most browsers). If there’s a message saying the API key is invalid, get a new one and delete the original.
A common error is having the maps API loaded multiple times. See the Troubleshooting FAQ section if there are console errors indicating the API has been loaded more than once.
Places API (New)
The map search box and address lookup use Google’s Places API. If your Google project still uses the legacy version, administrators see an alert with a direct link to enable Places API (New). Visitors never see it, and maps keep working. Open the link, click Enable, wait two or three minutes and reload. Nothing needs to change in MapPress.
Geocoding
A geocoder is a web-based service that translates addresses like ‘200 Main Street’ into latitude and longitude coordinates that can be displayed on a map.
The Google API always uses the Google geocoder. For Leaflet, several geocoders are available:
- Google: excellent, but requires a Google API key.
- Mapbox: excellent; requires a Mapbox access token, which has generous free usage limits.
- LocationIQ: requires a LocationIQ access token.
- Nominatim: free and requires no registration, but less accurate. In many locations it only finds the nearest street: if a house address is entered, it returns the middle of that street.
| Service | Terms of Service | Free | Registration | Usage Limit | Accuracy |
|---|---|---|---|---|---|
| MapBox | Link | No | Yes | 100,000 per month | Exact |
| Link | No | Yes | Yes | Exact | |
| Nominatim | Link | Yes | No | None | Exact in some Locations, street elsewhere |
| LocationIQ | Link | Free tier | Yes | 5,000 per day | Varies by location |
Creating a Map
MapPress supports both the Gutenberg Editor and the Classic Editor, making it easy to create a map while editing a post. Maps created in this way are linked to the underlying post, and can be displayed in ‘mashup’ maps.
When MapPress editing popup opens, it displays the Map Library, a list of all maps and which post they’re linked to – it’s similar to the Media Library in WordPress. From the Map Library, maps can be selected to edit or delete.
The Map Library can also be opened directly from the MapPress menu, without first going to the WordPress post editor.
Create a Map with the Gutenberg Block Editor
Add the MapPress Map block to a post or page. Use the block sidebar for the map size and other options.
To insert an existing map, or replace the map with another one, click the Map Library button in the block toolbar. The Map Library lists all maps. You can show only the maps attached to the current post, or search by map ID, map title or post title.
Create a Map with the Classic Editor
In the classic editor, click the MapPress button above the editor, next to Add Media. This opens the Map Library, where you can create a new map or pick an existing one and insert its shortcode into the post.
Editing a Map
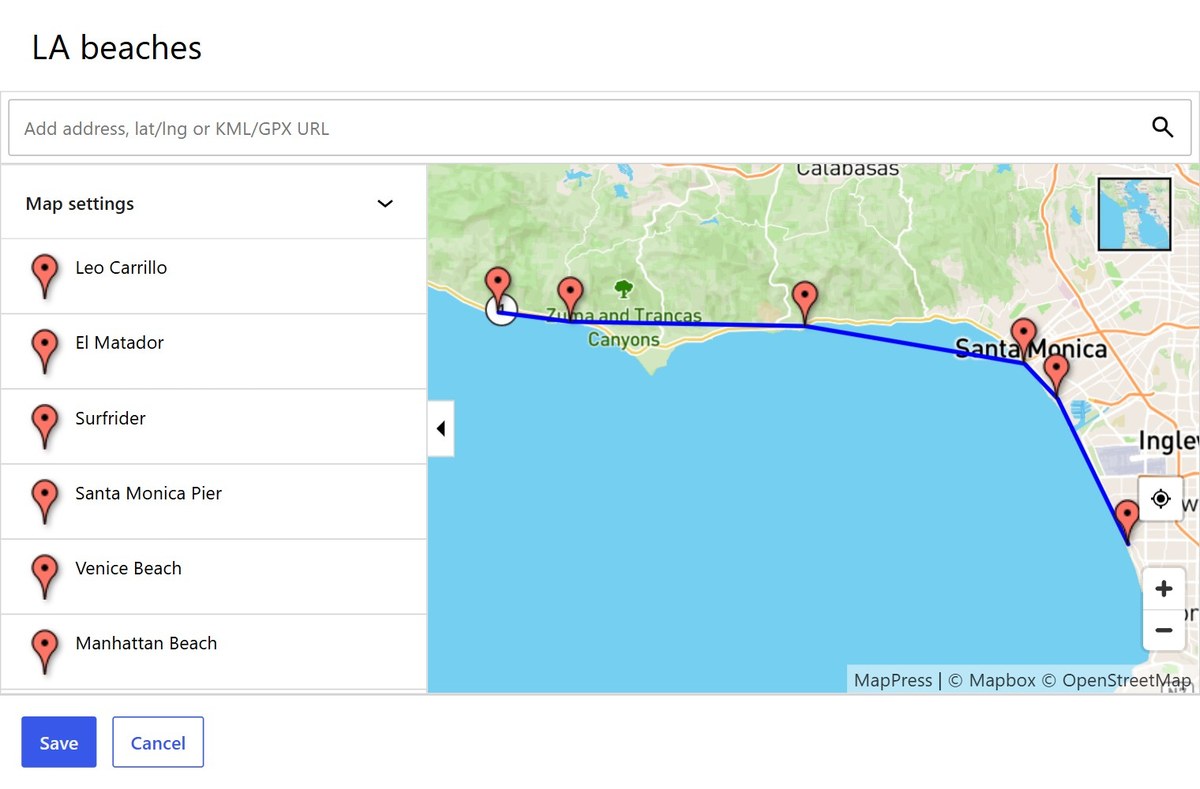
The map editor opens from the Map Library, the MapPress block, or the MapPress button in the classic editor.
- Title: the map title shown in the Map Library.
- Search box: add a POI by address, place, latitude/longitude, or a KML/GPX file URL.
- POI list: click a POI to edit it, or drag POIs to change their order.
- Map settings: size, center and zoom, style, POI list, search, filter and travel lines for this map.
- Style: the thumbnail in the top-right corner switches the map style.
- Save / Cancel: save or discard your changes.
Each saved map gets an ID, shown in the Map Library. Use it to display a specific map, for example [mappress mapid="2"].
Creating a POI
To add a POI, type an address, place or business in the search box and pick a result. You can also enter latitude and longitude as decimals, for example 38.8977,-77.0365 for the White House.
Nominatim is often only accurate to the nearest street. For exact addresses use the Google, Mapbox or LocationIQ geocoder. See Geocoding.
Click a POI to edit it. The POI editor has four tabs:
| Description | Title, icon (click it to change the icon, Pro), and body text with a Visual/HTML editor. |
| Media | Images and a video URL. |
| Address | The address used for directions, the latitude and longitude, and Update lat/lng from address. |
| Data | The POI data fields defined in Settings → POI Data. |
Click the trash icon to delete the POI.
Map Styles
Click the thumbnail in the top-right corner of the map to choose a style. The styles available depend on the map engine:
- Google: Roadmap, Terrain, Satellite, Hybrid
- Leaflet with OpenFreeMap: Liberty, Bright, Positron, Dark
- Leaflet with Mapbox: Streets, Outdoors, Light, Dark, Satellite, Satellite Streets
MapPress Pro can also add your own styles. See Custom Map Styles.
Live demo: Map styles and dark mode
Drawing Lines and Shapes
When the Google engine is selected, the map editor shows a drawing toolbar:
- Add a marker: click the map.
- Draw a line / Draw a shape: click to add each point. Double-click to finish, or click the first point to close a shape.
- Draw a rectangle / Draw a circle: press, drag to size it, and release.
- Press Esc to cancel the shape you’re drawing.
To change a shape, click it to show its handles:
- Drag a point to move it.
- Drag a handle between two points to add a new point.
- Right-click a point to delete it.
- Drag the shape itself to move the whole shape.
- Click the map to finish editing.
Lines and shapes drawn on Google maps are also displayed on Leaflet maps, so they stay on your maps if you switch engines.
KML and GPX Files
To add a KML or GPX file to a map, enter the file’s URL in the search box in the map editor, for example https://example.com/wp-content/uploads/route.gpx.
MapPress reads the file and draws it on the map using the file’s own styles: line colors and widths, fills, and “no outline” or “no fill” settings. This works the same way on Google and Leaflet, including on localhost and staging sites.
Host Files on Your Own Site
Upload KML and GPX files to your own WordPress site, for example to the Media Library or the /wp-content/uploads folder. Browsers block pages from reading files on other websites (a security feature called CORS), so a file hosted elsewhere usually can’t be read.
On sites using https, file links starting with http are switched to https automatically.
Google’s KML Layer Retires in May 2027
On Google maps, a few kinds of files still go through Google’s own KML layer, which Google is retiring in May 2027:
- KML files hosted on another website
- KMZ (zipped KML) and GeoRSS files
- KML links without a
.kmlextension, such as Google My Maps export links
To keep these working after May 2027, save the file as a plain .kml file and upload it to your own site. KMZ files aren’t supported on Leaflet; convert them to KML first.
Sample KML Files
These samples are hosted on other sites, so download them and upload them to your own site before using them.
Chicago transit lines, from Google:
https://googlearchive.github.io/js-v2-samples/ggeoxml/cta.kml
Outlines of US states:
https://developers.google.com/kml/documentation/us_states.kml
KML files for each US state, from the US Census:
https://www.census.gov/geographies/mapping-files/time-series/geo/kml-cartographic-boundary-files.html
Sorting
Drag POIs in the editor’s POI list to change their order. To sort automatically, use the Sort setting: by title, or by distance to the last search.
Dragging POI Markers
Sometimes it’s impossible to exactly locate a POI using a street address. In this case the POI’s marker can be dragged to the correct location. Note that POIs that have been dragged do not have a street address, they have only latitude/longitude coordinates.
Shortcodes
The simplest form of the shortcode displays the first map for a post:
[mappress]
A map ID can also be specified to display a specific map:
[mappress mapid="2"]
Many other parameters are available – see the “Reference” section. For example, this will open 400×400 map with mapid “1234”. It will also open the first marker immediately:
[mappress mapid="1234" width="400" height="400" initialopeninfo="true"]
Converting Existing Shortcodes in the Gutenberg Editor
To edit a map that was inserted with a shortcode, convert the shortcode to a block. If the post is still in a Classic block, select it and choose Convert to blocks from the block menu.
Shortcodes must be on a line of their own, with no text or punctuation next to them.
If the shortcode is in a Shortcode block, select it and use Transform to in the block toolbar to change it to a Map or Mashup block.
Map Sizing
For responsive maps, set the map width to a percentage. 90% works well because it leaves space along the side of the page for scrolling on mobile devices.
Map height usually works best as a fixed pixel size, but it can also be set to a percentage. The percentage is based on the map’s width. For example a map with 100% height is as tall as it is wide. Similarly, a height of 56.25% corresponds to a 16:9 aspect ratio.
Maps can also be set to a percentage of the viewport width or height. For example 50vw will size the map to half the width of the browser window, at 50vh will do the same for the height.
Live demo: Responsive maps
Marker Clustering and Spiderfying
When a map has many markers close together, clustering groups them into bubbles that show how many locations each one holds. Zooming in splits the bubbles into smaller groups and then individual markers, with a short animation as they merge and split. Click a bubble to zoom in on its locations. Clustering works the same way on Google and Leaflet.
To enable it, check Enable marker clustering in the MapPress settings. The Max zoom setting stops clustering above a given zoom level; leave it on Auto unless you have a reason to change it.
When several locations share exactly the same position, such as offices in one building, their markers overlap. Spiderfying fans them out in a circle when clicked, so each one can be selected. It’s controlled by Split up POIs at the same location (on by default), and Line color sets the color of the lines joining each marker to the shared point. Spiderfying works on Google and Leaflet, with or without clustering.
Live demo: Marker clustering
Template Tags
Maps can be displayed by adding PHP template tags to theme template files. MapPress loads all of the required JavaScript and CSS only when a map is being displayed.
The easiest way to add a map to your template is using the do_shortcode() statement.
For example, this will display the map with mapid=20:
<?php echo do_shortcode('[[mappress mapid="20"]]'); ?>Put the whole shortcode in single quotes, but the shortcode arguments in double quotes
Backing Up and Copying MapPress Data
MapPress stores maps in one database table, mapp_maps (with your site’s table prefix, for example wp_mapp_maps). Settings are stored in the WordPress options table as mappress_options.
A full database backup includes the table. WordPress’s Tools → Export does not, so when copying a site to a new server, copy the mapp_maps table as well.
Each map records the ID of the post or user it belongs to. If post IDs change during a move, update the maps for those posts to the new IDs.
MapPress Pro
Overview
MapPress Pro adds the features you need for store locators, directories and other sites with many locations:
- Mashups: show your posts on one map, for example a store locator
- Search and “near me” geolocation
- Filters by category, tag, post type or POI data
- Custom icons with a built-in icon editor
- Custom templates for popups and location lists
- Maps from custom fields, ACF and CSV import
Compare free and Pro or get MapPress Pro.
Icons
MapPress Pro includes an icon editor for creating custom icons. It’s available in the MapPress settings and in the map editor.
To set a POI’s icon, open the POI in the map editor and click the icon next to its title. Pick an icon from the list, or click Use default icon. The default icon is set with the Default icon setting.
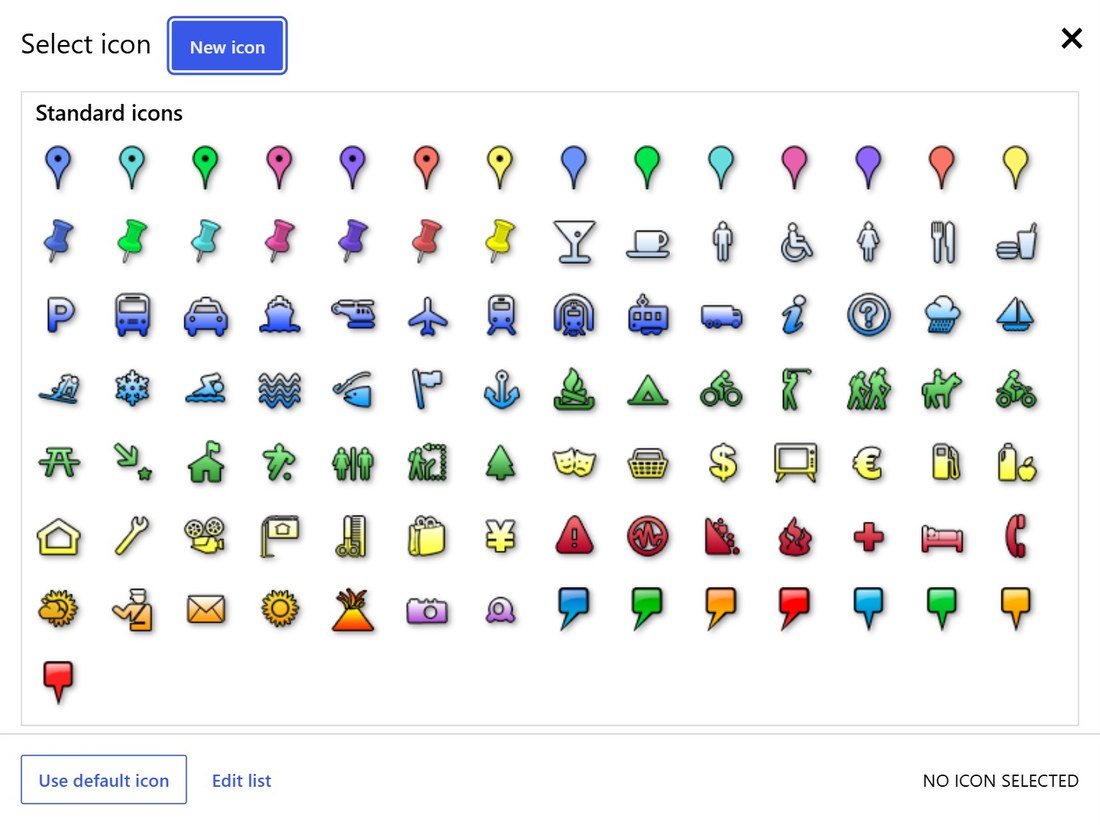
Live demo: Custom map markers
Creating New Icons
Click New icon in the icon list to open the icon editor. Choose a shape, fill and stroke colors, and an optional symbol from the Map icons or Google Material Icons fonts, then click Save.
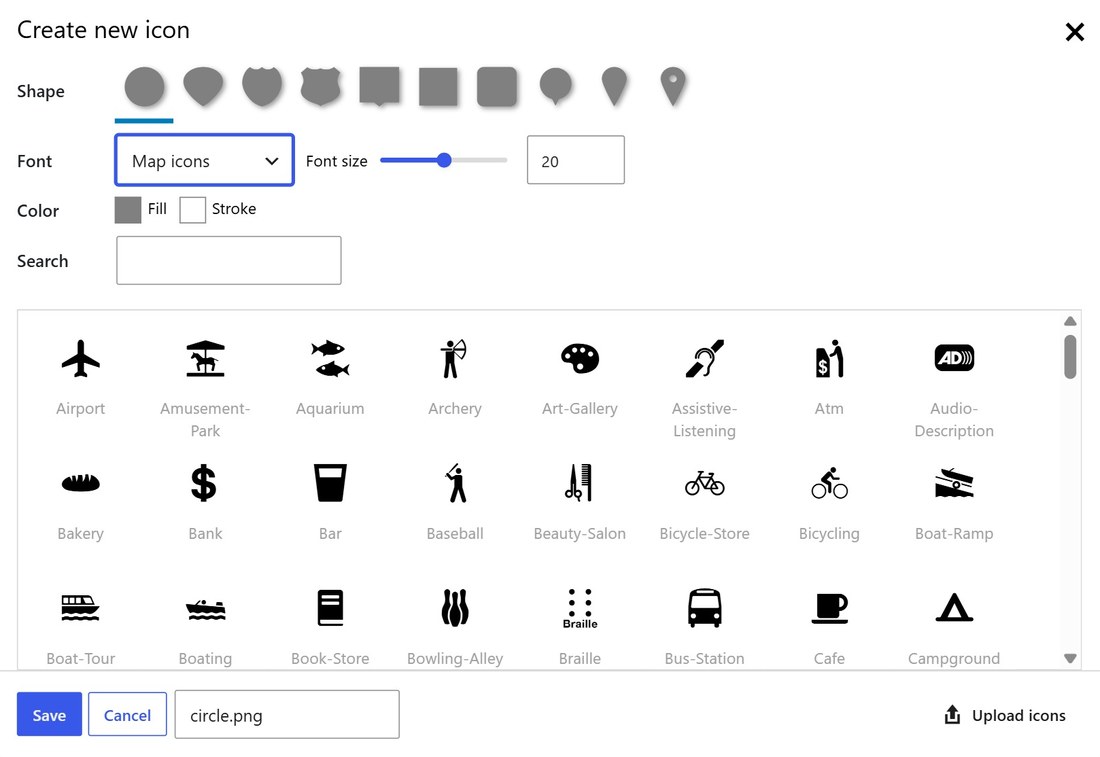
Uploading Custom Icons
Click the ‘upload icons’ link in the bottom-right of the icon editor to upload custom icons.
FTP Custom Icons
It’s usually easiest to upload icons with the icon editor, but you can also copy them by FTP.
Standard icons are in the /pro/standard_icons/ folder of the plugin. Custom icons go in the uploads folder:
/wp-content/uploads/mappress/icons
Some themes change the uploads folder; the correct location is shown in the Icon directory setting. Icons can be .svg, .png, .jpg or .gif files, usually around 32×32 pixels.
Automatic Icons
Use the Automatic icons setting to assign icons by post type, category, tag or custom taxonomy. Pick a taxonomy, then choose an icon for each term (the Key column). Every POI attached to a post with that term shows the selected icon.
Custom taxonomies must have “Show in REST API” enabled. Automatic icons appear on the front end only; the map editor still shows the icon each POI was saved with.
Mashups
Mashups combine multiple maps into a single larger map.
Mashups are based on a query, which specifies which posts to display. MapPress reads all of the matching posts and combines the map locations from those posts into a single mashup map.
The mashup query can find a single post, all posts, or posts matching certain post type, author, tag, category, taxonomy, or custom field.
Live demo: Store locator · Multiple locations
Mashups in the Gutenberg Editor
Add the MapPress Mashup block, then choose which posts to show in the block sidebar, for example by post type, category or tag.
Mashups in the Classic Editor
In the classic editor, mashups are created by typing a shortcode directly into the post content. The most basic version of the shortcode is:
[mashup]
This will create a mashup map of all posts.
WordPress shortcodes must be on a separate line, or they won’t work
Mashup Queries
More advanced mashups requires a query attribute to specify which posts to read. The query is in the same format as the WordPress query_posts function, so query examples are available in the WordPress Codex for WP_Query.
Query Examples
Show a single post with post ID = 5:
[mashup query="p=5"]
Show a single page with page ID = 5:
[mashup query="page_id=5"]
Show map locations from the currently displayed posts (you may also just omit the query parameter):
[mashup query="current"]
Show all pages with maps:
[mashup query="post_type=page"]
Show the posts (or pages) with post ID = 3, 4 and 5:
[mashup query="post__in=3,4,5"]
Show the posts in category “mycat”:
[mashup query="category_name=mycat"]
Show posts for custom post type “business”:
[mashup query="post_type=business"]
Shows posts for tags 37 and 47:
[mashup query="tag__and=37,47"]
Show posts assigned to category 1 or category 3:
[mashup query="category__in=1,3"]
Show posts assigned to both category 1 and category 3:
[mashup query="category__and=1,3"]
Show posts that have the custom field ‘color’, regardless of the field value:
[mashup query="meta_key=color"]
Show posts that have the custom field ‘color’ set to the value ‘blue’:
[mashup query="meta_key=color&meta_value=blue"]
The order and orderby parameters can be used to sort the query results by various fields including author, date, etc. For example to sort all posts by date, descending:
[mashup query="orderby=date&order=desc"]
Show posts with custom taxonomy ‘hotels’ with term value=budget:
[mashup query="hotels=budget"]
Posts having custom taxonomy ‘hotels’ with value ‘luxury’ AND custom taxonomy ‘rating’ with value ‘5star’:
[mashup query="hotels=luxury&rating=5star"]
This excellent article has additional examples about custom taxonomy queries: https://thereforei.am/2011/10/28/advanced-taxonomy-queries-with-pretty-urls/
Queries Using Arrays
WordPress expects an array value for some parameters. For example dates are specified with a date_query array. This array would show posts created before yesterday:
'date_query' => array(
    array(
        'before'      => 'now-1day'
    )
)
WordPress shortcodes don’t support arrays directly, so arrays must be converted to a URL string notation, where [0] is the first array element, [1] is the second, and so on:
date_query[0][before]=now-1day
Unfortunately, WordPress also prohibits braces in shortcodes! To work around this, MapPress allows the parameters to be enclosed in curly braces. instead (you may also use the HTML codes %5d and %5e instead of braces). For example, the query above is written like this in the mashup shortcode:
[mashup query="date_query{0}{before}=now-1day"]
or:
[mashup query="date_query%5b0%5d%5bbefore%5d=now-1day"]
Queries Using URL Parameters
WordPress parses the URL for various parameters. For example, category archives are displayed with the following URL format:
https://myblog.com/category/mycat
When the page is displayed, WordPress places the current category name in the ‘cat’ parameter (in this case, it’s category ‘mycat’). To create a mashup that displays the current page category, no matter what it is, specify the ‘cat’ query parameter as ‘@cat’:
<?php echo do_shortcode('[mashup query="cat=@cat"]'); ?>
Mashup Template Tag
Adding a mashup to your template is easy. Just add a few lines of PHP code:
<?php echo do_shortcode('[[mashup]]'); ?>For example, this will display a mashup of all maps:
<?php echo do_shortcode('[[mashup width="425" height="350"]]'); ?>Be careful to put the whole shortcode in single quotes but the shortcode arguments in double quotes
It’s also possible to use variables in the query. For example, adding this code to the category archive template will show all posts in the current category:
<?php
$cat = get_category( get_query_var( 'cat' ) );
$cat_id = $cat->cat_ID;
$query = "cat=" . $cat_id;
echo do_shortcode('[mashup width="425" height="350" query="' . $query . '"]');
?>
Mashup Search
Turn on Display search to show a search box on mashups (and, optionally, on maps). Visitors enter an address, business or place to center the map there. While a search is active, the POI list shows results from the current map area.
By default, markers are shown within a 15 km radius of the search result. Change this with the Search radius setting, or per map with the shortcode radius and units attributes, for example [mashup search="true" units="imperial" radius="25"].
To list the nearest locations first, set Sort to Distance to last search.
Live demo: Map search · Store locator
Search Biasing
Search results are always biased towards locations within the current viewport. For example, if a map of the world is displayed searching for “Paris” will show “Paris, France” as the first item in the list. If the map is zoomed in on Texas, the first result is “Paris, TX”.
Search Restriction
Searches can be restricted by country, in which case only results from that country will be displayed.
For the Mapbox and Nominatim geocoders, a bounding box can also be set to restrict searches to a specific geographic area. For example, to restrict searches to only the New York City area, enter “-75.32776,40.12009,-72.66632,41.31289”.
Map Filters
Filters (MapPress Pro) let visitors narrow a map to the locations they want, for example by category. Set them up in Settings → Filters, then turn them on with Display filters for mashups, maps, or both.
The Filters setting has three tabs. Add a filter on a tab with the + button, drag filters to reorder them, and click a filter to edit it.
Mashups of Posts
Each filter is one of:
- A taxonomy, such as categories, tags or a custom taxonomy. Use Include slugs or Exclude slugs to limit which terms are offered.
- Post type.
- Text search: a box that matches the post title, or the title and body. Check Show separately to display it apart from the other filters.
Mashups of Users
Filter by user role.
Maps
Filter a map’s POIs by any field defined in Settings → POI Data.
Filter Options
| Format | Checkboxes, radio buttons or a select list. Text search is always a box. Default: Checkboxes |
| Label | Label shown to visitors. |
| Sort | Order terms by name or slug (taxonomies and roles). |
| Placeholder | Placeholder text for select lists, radio buttons and text search. |
Live demo: Map filters
MapPress Templating
MapPress maps are displayed using customizable map template files. Each file controls a part of the map output.
JavaScript Templates
Templates are rendered in the browser. The template files are:
| map-popup.php | Map POI popup |
| map-item.php | Map POI list row |
| mashup-popup.php | Mashup POI popup |
| mashup-item.php | Mashup POI list row |
| mashup-modal.php | Post shown in a modal, when Marker click is set to open the post in a modal |
| user-mashup-popup.php | User mashup popup |
| user-mashup-item.php | User mashup list row |
Customizing JavaScript Templates
JavaScript templates can be edited directly in the MapPress settings screen, using the template editor. The editor shows either the default template file (from the plugin directory /templates) or a customized file (if one exists). Customized template files are always saved to the theme or child theme directory.
JavaScript templates contain a mix of HTML, PHP, template variables, and JavaScript.
PHP Code
Template files are PHP files, so they can include PHP. For example, use _e() to output text that multilingual plugins can translate:
<?php _e('Directions'); ?>
Template Variables
Template variables use underscore.js-style delimiters. The following delimiters are used:
{{ ... }}: HTML-escaped variables (for example character ‘&’ will be escaped to ‘&’{{{ ... }}}: Variables without HTML-escaping
The available POI fields are shown above the editor. Click a field name (such as ‘title’ or ‘body’) to insert the template variable and the correct delimiters.
Conditional Content
To show part of a template only when a field has a value, wrap it in {{#field}} ... {{/field}}. To show something only when the field is empty, use {{^field}} ... {{/field}}. For example, this shows a phone number only for POIs that have one:
{{#poi.props.phone}}<p>Phone: {{poi.props.phone}}</p>{{/poi.props.phone}}
Custom field names may contain hyphens.
Custom Fields
To add a custom field to a template, use this syntax:
{{poi.props.myfield}}
MapPress will automatically include that custom field when the template is output.
Custom Properties
Each POI has a set of standard properties (title, body, etc.). It also has a ‘props’ array that contains custom properties.
Filter mappress_poi_props can be used to add custom properties to the props array. For example, adding this code to a theme’s functions.php file will create a ‘message’ property for each POI that shows a ‘hello’ message and the POI’s underlying post ID:
<?php
 function myfilter($props, $postid, $poi) {
     $props['message'] = "Hello from post " . $postid;
 return $props;
 }
 add_filter('mappress_poi_props', 'myfilter', 10, 3);
 ?>
The new message property can now be included in templates as:
{{poi.props.message}}
Widgets
MapPress Pro adds two widgets to the WordPress Widgets screen: MapPress Map shows a single map, and MapPress Mashup shows a mashup of posts.
Live demo: Map widget
Mashup Widget
The Mashup widget takes the same query as the [mashup] shortcode, without the shortcode itself. For example, the shortcode [mashup query="page_id=5"] becomes this in the widget:
page_id=5
Or, to show all posts in category “cat1”:
category_name=cat1
Importing Maps
The MapPress Import page (Pro) creates maps from a CSV file, either uploaded from your computer or read from a Google Sheet. A Google Sheet must be shared before it can be imported.
Import creates stand-alone maps. To create maps linked to posts, for example for a directory site, see Generating Maps From Custom Fields.
The file has one row per POI, with these columns:
| mapid | Optional. Groups rows into maps, so one file can create several maps. |
| lat, lng | Latitude and longitude (lon also works). |
| address | Address to geocode if there are no coordinates. If both are given, the coordinates place the POI and the address is used for directions. |
| title | POI title. |
| body | POI body. |
| iconid | Icon ID, for example blue-dot for a standard icon or myicon.png for a custom one. Hover over an icon in the icon editor to see its ID. |
| POI data fields | Any field defined in Settings → POI Data. |
If the file has a mapid column and Use map IDs from file is checked, existing maps with those IDs are overwritten.
- MapPress isn’t built for bulk geocoding. For more than about a hundred addresses, a dedicated bulk geocoding service is cheaper and faster.
- If titles or bodies contain accents or other special characters, save the file as UTF-8 (for example, “CSV UTF-8” in Excel). Unrecognized characters appear as question marks.
Generating Maps From Custom Fields
MapPress Pro can generate a map automatically for each post (or user) from address data in custom fields. This is useful if your posts already store addresses, or if you import posts from a file with any CSV importer plugin.
Each generated map has one POI. Choose the fields in Settings → Generate Maps from Custom Fields: an address (several address fields are joined with commas), or latitude and longitude. You can also choose fields for the POI title, body, icon and zoom. It’s often easier to assign icons with Automatic Icons than per post.
A map is generated whenever a post with those fields is published or updated. To generate maps for existing posts, click Geocode posts (or Geocode users) in the same section.
If errors occur during map generation, they are shown in the MapPress settings. Error details are also stored in the post, in the custom field mappress_error.
Geocoding
When maps are generated from custom field data, the address is geocoded (converted to latitude/longitude coordinates) using the geocoder selected in the MapPress settings. Google bills geocoding against your API key, so if lookups start failing, check your quota and billing in the Google Cloud Console.
If an address can’t be geocoded, no map is created for the post, and any map previously generated for it is removed. The error is shown in the MapPress settings and saved in the post’s mappress_error custom field. Posts with latitude and longitude fields are placed directly, without geocoding.
Viewing Custom Fields
The block editor hides custom fields by default. To see them, open the post, click the three-dot Options menu in the top-right corner, choose Preferences, and under General → Advanced turn on Custom fields. The editor reloads and the Custom Fields panel appears below the post content.
Manually Editing Generated Maps
Generated maps can be edited manually. However, the map will normally re-generated if the post is published or updated, overwriting any manual changes. To prevent this, uncheck the setting ‘Overwrite maps when posts are saved’.
Events for Generating Maps
MapPress generates maps only when a post is saved or published. Some forms and custom field plugins update custom fields directly, without saving the containing post. In this case it is necessary to trigger map generation using some PHP code. See The ‘Examples’ section for code samples.
Displaying Maps Using PHP
Maps can be displayed dynamically by using PHP code in template files.
MapPress uses the classes Mappress_Map, Mappress_Poi and Mappress_Options to define maps, POIs and options settings, respectively. Object constructors accept an array of attributes to override defaults settings.
For example, this code creates a new map object. If no size is given, the default size from the settings is used, but in this example the width is set to 600px:
$mymap = new Mappress_Map(array("width" => 600));
This creates two new POI objects, specifying the title, body and ‘point’ (the latitude / longitude):
$mypoi_1 = new Mappress_Poi(array("title" => "DC", "body" => "Beautiful Washington, DC", "point" => array("lat" => 38.90279, "lng" => -77.037849)));
$mypoi_2 = new Mappress_Poi(array("title" => "500 Chestnut St", "body" => "Independence National Park, Philadelphia, PA<br/>19106", "point" => array("lat" => 39.948712,"lng" => -75.15001)));
Once the POIs have been defined, they can be added to the map:
$mymap->pois = array($mypoi_1, $mypoi_2);
Finally, the map can be displayed:
echo $mymap->display()
Putting it all together gives the following code:
$mymap = new Mappress_Map(array("width" => 600));

$mypoi_1 = new Mappress_Poi(array("title" => "DC", "body" => "Beautiful Washington, DC", "point" => array("lat" => 38.90279, "lng" => -77.037849)));

$mypoi_2 = new Mappress_Poi(array("title" => "500 Chestnut St", "body" => "Independence National Park, Philadelphia, PA<br/>19106", "point" => array("lat" => 39.948712,"lng" => -75.15001)));
$mymap->pois = array($mypoi_1, $mypoi_2);
echo $mymap->display();
Setting Center and Zoom
If a map has no center and zoom specified, it will be automatically centered and zoomed to show all of its POIs. It’s also possible to set a specific center or zoom. For example, this code will show a map centered over Washington, DC (without any POIs):
$mymap = new Mappress_Map(array("center" => "38.9027,-77.037849", "zoom" => 12));
echo $mymap->display();
If you specify a center, you must also specify a zoom, and vice-versa. Both parameters are required in order to show the map.
Icon IDs
Each POI may have its own icon. The iconid property specifies either a standard icon or a custom icon for each POI. For standard icons the icon ID is the image file name without any extension. For example the icon ID for the standard green dot icon green-dot.png is green-dot. For custom icons, the icon ID is the entire filename including the extension, such as myicon.png
In the example below the first POI is assigned to the standard green dot icon and the second is assigned to a custom icon called “family.png”:
$mymap = new Mappress_Map(array("width" => 600));
$mypoi_1 = new Mappress_Poi(array("iconid" => "green-dot", "title" => "Standard Icon Example", "point" => array("lat" => 38.90279, "lng" => -77.037849)));
$mypoi_2 = new Mappress_Poi(array("iconid" => "family.png", "title" => "Custom Icon Example", "point" => array("lat" => 40.7269, "lng" => -74.0087)));
$mymap->pois = array($mypoi_1, $mypoi_2);
echo $mymap->display();
Geocoding with PHP
If POIs are defined by street address (rather than latitude/longitude) the geocode() method must be used before the map is displayed. This method geocodes the address and defaults the POI title and body, if they aren’t set explicitly.
For example, to create a POI using the street address “500 Chestnut St” use:
$mypoi = new Mappress_Poi(array("address" => "500 chestnut st, phildelphia"));
$mypoi->geocode();
The above code geocodes the POI every time the map is displayed, so high-traffic blogs may encounter Google’s geocoding usage limit (see the ‘Geocoding’ section for details). If so, it may be better to generate the maps using custom fields, or use the Nominatim geocoder.
Custom Map Styles
MapPress Pro can add your own map styles. Click the style thumbnail in the top-right corner of the map editor, then New style. Saved styles appear in the style list for every map, and one can be made the default with the Default style setting.
- Google: paste style JSON, or click Download style to browse and pick a style from Snazzy Maps.
- Leaflet with OpenFreeMap: enter the URL of a MapLibre style, or paste the style JSON.
- Leaflet with Mapbox: enter the style URL from Mapbox Studio (the
mapbox://styles/…share URL).
Live demo: Map styles and dark mode
Reference
Overriding Map CSS
The default MapPress styles are in the plugin file css/mappress.css. Don’t edit that file, or your theme’s style.css: both are overwritten by updates. Instead, add your CSS to a child theme or to Appearance → Customize → Additional CSS.
Rules there take priority over the MapPress defaults. For example, to put a 10px margin around the map:
.mapp-layout { margin: 10px; }
Translation Support
MapPress is fully translatable. All strings and templates are localized and can be translated using POEdit. A POEdit guide is available in the MapPress FAQ.
Leaflet map controls are displayed using the current blog language. For Google, the API defaults to the browser language, but it can be forced to a specific language by entering a value in the ‘language’ setting in the MapPress settings screen.
WPML
MapPress fully supports the WPML translation program. Learn more about MapPress and WPML.
Custom Map Tiles
If you have a custom map, you can replace the map tiles.
Custom tiles for Google
Google custom tiles hasn’t been implemented yet. If you need this functionality, please contact me and describe your use case (for example, image overlay on normal map or completely replacing the map tiles).
Custom tiles for Leaflet
For Leaflet, PHP filter mappress_options can be used override the MapPress translations and options before the are sent to the map, and replace the tile providers and allowed styles (tilesets).
For example, to replace the standard tile providers and styles use the code below in your functions.php:
function myfilter($l10n) {
$l10n['options']['tileProviders']['custom'] = array(
'attribution' => ['<a href=https://openstreetmap.org target="_blank">© OpenStreetMap</a>'],
'url' => 'https://{s}.tile-cyclosm.openstreetmap.fr/cyclosm/{z}/{x}/{y}.png',
'imageUrl' => null // Use this if you have a thumbnail image for the tileset
);
$l10n['options']['standardStyles'][] = array(
'id' => 'custom1',
'type' => 'standard',
'provider' => 'custom',
'name' => __('Custom')
);
return $l10n;
}
add_filter('mappress_options', 'myfilter');
Settings
The settings screen sets defaults for all maps. Many can be overridden per map with block settings or shortcode attributes. Sections marked (Pro) are only in MapPress Pro.
Basic Settings
| MapPress license key | Pro. Enables automatic updates. Find it in your account. |
| Beta versions | Pro. Allow updates to beta versions. Default: Off |
| Mapping API | Leaflet (free) or Google (API key required). Default: Leaflet |
| Mapbox access token | Enables Mapbox tiles, styles and geocoding. |
| Tile Service | Leaflet tiles: OpenFreeMap or Mapbox. Default: OpenFreeMap |
| Geocoder | Leaflet geocoder: Google, Mapbox, LocationIQ or Nominatim. See Geocoding. Default: Nominatim |
| LocationIQ access token | Required for the LocationIQ geocoder. |
| Google API key | Required for Google maps or the Google geocoder. |
| Compatibility mode | Show maps in an iframe to avoid conflicts with other plugins. Default: Off |
| GDPR Compliance | Shows whether Complianz is active. No setup needed. |
Map Settings
| Automatic display | Show a post’s maps at the top or bottom of the post. Default: None |
| Map alignment | Alignment for classic editor maps. Default: Default |
| Mini width | Below this width (px), maps with a list use map/list toggle buttons. Default: 500 |
| Scroll wheel zoom | Zoom with the mouse scroll wheel. Default: On |
| Map controls | Show the map menu and Street View control. |
POIs
| Open first POI | Open the first POI when the map loads. Default: Off |
| Initial zoom | Zoom for single-POI maps and geolocation. Default: 15 |
| Highlight selected POI | None, circle, scale or icon. Default: None |
| Hover | Open popups on hover. Default: Off |
| Travel lines | Connect POIs with lines (color, curved lines, arrow or animated icon). Default: Off |
POI List
| Display | Show a list of POIs with each map. Default: On |
| Initial open | Open the list when the map loads. Default: On |
| Viewport | List only POIs visible on the map. Default: Off |
| Paging | POIs per page. Default: 20 |
| Sort | None, title, or distance to the last search. Default: None |
| KML | Include KML POIs in the list. Default: On |
Directions
| Directions | Inline form, or straight to Google Maps. Default: Google |
| Directions link | Show the directions link in popups, the list, or both. Default: Popups |
| Directions text | Text for the directions link. Default: Get Directions |
POI Data
| Data fields | Extra fields to store with each POI, for templates and map filters. See Map Filters. |
Styled Maps
| Default style | Style for all maps. See Custom Map Styles. |
Icons (Pro)
| Default icon | Icon for POIs without their own icon. |
| Icon directory | Where custom icons are stored. |
| Icon size | Fixed icon size for maps and the list. |
| Automatic icons | Assign icons by post type or taxonomy. See Automatic Icons. |
Clustering
| Clustering | Group nearby markers. See Marker Clustering and Spiderfying. Default: Off |
| Max zoom | Stop clustering above this zoom level. Default: Auto |
Spiderfy
| Spiderfy | Fan out POIs at the same location. See Marker Clustering and Spiderfying. Default: On |
| Line color | Color of the spiderfy lines. Default: Gray |
Mashups (Pro)
| Marker click | Open the popup, the post, the post in a new tab, or the post in a modal. Default: Open popup |
| Popup content | POI title and body, or post title and excerpt. Default: POI title + body |
| Thumbnails | Post featured image or POI images. Default: Post featured image |
| KMLs | Include KML POIs in mashups. Default: Off |
Search (Pro)
| Display search | Show the search box on mashups, maps, or both. See Mashup Search. Default: Mashups |
| Search radius | Minimum radius around a search, in km. Default: 15 |
| Custom search placeholder | Placeholder text for the search box. |
| Search country | Limit searches to one country. |
| Search URL parameter | URL parameter that pre-fills the search. |
| Bounding box | Limit searches to an area (Mapbox and Nominatim). |
Geolocate (Pro)
| Geolocate | Center on the visitor’s location (https only). Default: Off |
| User location | Show the visitor’s location as a blue circle (https only). Default: Off |
Filters (Pro)
| Display filters | Show filters on mashups, maps, or both. Default: Mashups |
| Filters position | Top of the map or in the list. Default: Top |
| Initial open | Open filters when the map loads. Default: Off |
| Filters | The filters to show. See Map Filters. |
Templates (Pro)
| Custom templates | Edit popup and list templates. See MapPress Templating. |
| Directions link | Show the directions link in popups, the list, or both. Default: Popups |
| Thumbnails | Thumbnail position in popups and the list. Default: Left (popups) |
| Popup thumbnail size | Image size or pixel size for popup thumbnails. Default: Medium |
Localization
| Language | Language for searches and Google map controls. If blank, Google uses the browser language. |
Generate Maps from Custom Fields (Pro)
| Custom fields | Fields with the address or lat/lng, title, body, icon and zoom. See Generating Maps From Custom Fields. |
| Post types | Post types to generate maps for. Default: Posts, Pages |
| Overwrite | Regenerate maps on publish/save. Default: On |
| Google Server API key | Only needed if your Google key is restricted by referrer. |
| Geocoding errors | The most recent geocoding errors. |
Frontend Forms (Pro)
Shown only when ACF is active.
| Advanced Custom Fields | ACF location field to include in mashups. See ACF. |
Miscellaneous
| Map column | Add a “Map” column to post lists for these post types. Default: Posts, Pages |
| Map sizes | Default sizes offered in the map editor. Default: 100% × 350px, and four others |
| Scripts | Output scripts in the footer. Turn off if maps load via AJAX. Default: On |
| WPML | Copy maps when overwriting a translation. See WPML. Default: On |
| Google API | Stop other plugins loading the Google Maps API twice. Default: On |
Shortcode Parameters
These attributes work in both the [mappress] and [mashup] shortcodes unless noted. Attributes you leave out use the MapPress settings. Pro attributes are marked (Pro).
For example, this shows a mashup of locations centered on the visitor, with search and a 25-mile radius:
[mashup query="post_type=location" center="user" search="true" units="imperial" radius="25"]
Which Map
| mapid | [mappress] only. The ID of the map to show.Default: The first map attached to the current post |
| query | [mashup] only (Pro). Which posts to show. See Mashups.Default: The posts on the current page |
| otype | [mashup] only (Pro). Set to user to show users’ maps instead of posts.Default: post |
| hideEmpty | [mashup] only (Pro). true hides the map when no locations match.Default: false |
Size and Position
| width | Width in px, %, or vw, for example 100%. See Map Sizing.Default: From the Map sizes setting |
| height | Height in px, %, or vh, for example 400px.Default: From the Map sizes setting |
| alignment | left, center, right or full.Default: From the Map alignment setting |
| class | Extra CSS classes for the map. |
Center and Zoom
| center | lat,lng (for example 38.8977,-77.0365), user to center on the visitor’s location (https only), or post to center on the current post’s first location.Default: Fit all locations |
| zoom | Zoom level, 1–21. Use it with a lat,lng center.Default: Fit all locations |
Features
| poiList | true or false: show the location list.Default: From the Display setting |
| search | (Pro) true or false: show the search box.Default: From the Display search setting |
| radius | (Pro) Search radius, in units.Default: 15 |
| units | metric or imperial, for the search radius and distances.Default: metric |
| filter | (Pro) true or false: show filters.Default: From the Display filters setting |
| initialOpenInfo | true opens the first location’s popup when the map loads.Default: false |
| lines | true connects locations with travel lines.Default: false |
| mapTypeId | Map style. Google: roadmap, terrain, satellite, hybrid. OpenFreeMap: liberty, bright, positron, dark. Mapbox: streets, outdoors, light, dark, satellite, satellite-streets.Default: From the Default style setting |
| layers | Google only. Show a layer when the map loads: traffic, bicycling or transit. |
| name | Name for the map’s JavaScript object. See Open a POI Using JavaScript. Default: mapp0, mapp1, … |
Map Controls
These are passed straight to the map engine, so some apply only to Google or only to Leaflet:
| scrollWheelZoom | Leaflet. false disables mouse-wheel zoom.Default: true |
| scrollwheel | Google. false disables mouse-wheel zoom.Default: true |
| zoomControl, fullscreenControl, mapTypeControl, streetViewControl, scaleControl, rotateControl | true or false to show or hide each control (availability depends on the engine). |
| minZoom, maxZoom | Limit how far visitors can zoom out or in. |
| draggable, dragging, keyboard, disableDoubleClickZoom, disableDefaultUI | Other engine options: draggable (Google) and dragging (Leaflet) turn panning off when false. |
Filters and Actions
Add these hooks in your theme’s functions.php or a small plugin.
Filters
| mappress_options ( $l10n ) | Settings and translations sent to the browser. See Custom Map Tiles for an example. |
| mappress_poi_props ( $props, $oid, $poi, $otype ) | Custom properties available to templates as {{poi.props.name}}. See MapPress Templating. |
| mappress_poi_iconid ( $iconid, $poi ) | Change a POI’s icon just before display (maps and mashups of posts). |
| mappress_poi_excerpt ( $excerpt, $raw ) | The post excerpt shown in mashup popups when Popup content is set to post title + excerpt. $raw is the unprocessed excerpt or content. |
| mappress_filter_values ( $values, $key ) | (Pro) The choices shown for a filter. Each value is an array with value, iconid and label; $key is the filter’s taxonomy or field. |
| mappress_filter_{key} ( $values, $query ) | (Pro) The values a filter applies to a mashup query, where {key} is the filter’s taxonomy, post (post types), role or text. Return the values to use: term IDs, post types, roles or search text. $query is the mashup’s query arguments. |
| mappress_pre_query ( $query, $args ) | (Pro) The WP_Query arguments for a mashup, before the query runs. |
| mappress_query_pois ( $pois, $query ) | (Pro) The mashup’s POIs after the query, for example to add locations from another source. |
| mappress_post_query ( $map, $args ) | (Pro) The mashup map after the query, before it’s prepared for display. |
| mappress_meta_value ( $poi, $meta_value ) | (Pro) Convert an array custom field value, such as an ACF Google Map field, into a POI when generating maps from custom fields. |
Actions
| mappress_map_display ( $map ) | Called just before a map is displayed. The map object can be changed, for example to add or remove POIs. |
| mappress_sort_pois ( $map ) | Called before display to sort POIs, when the Sort setting is None and the mashup query has no orderby. |
| mappress_map_save ( $map ) | Called after a map is saved. |
| mappress_map_delete ( $mapid ) | Called after a map is deleted. |
| mappress_empty_trash () | Called after trashed maps are permanently deleted. |
For example, to sort POIs by title in descending order:
function mysort($map) {
   usort($map->pois, 'reverse_sort');
}

function reverse_sort($a, $b) {
   return strcasecmp($b->title, $a->title);
}

add_action('mappress_sort_pois', 'mysort');
Frontend Forms
MapPress is compatible with a many popular front-end forms plugins.
Formidable Forms
It’s easy to create MapPress maps with Formidable Forms! Please see this page for detailed setup steps.
Advanced Custom Fields (ACF)
MapPress fully supports ACF. There are two ways to handle ACF data:
- Generate MapPress maps from ACF fields
or - Automatically include ACF maps in MapPress mashups
Regardless of which approach is used, the first step is to set add up your theme to display ACF fields and provide a Google Maps API key to ACF, as described here.
Live demo: ACF maps
Generate MapPress Maps from ACF Fields
If you edit maps in MapPress, you can generate MapPress maps from ACF text or Google Map fields, as described in Generating Maps From Custom Fields. For example, a form with several address fields can create a MapPress map when it’s saved.
Only text and Google Map fields are supported; checkboxes, text areas, editors and other field types won’t work. To use an ACF Google Map field, select it as the address field in Settings → Generate Maps from Custom Fields.
Include ACF Fields in Mashups
If you maintain locations in ACF, you don’t need to generate MapPress maps at all. ACF map locations can be shown directly in MapPress mashups, so the data stays in ACF while visitors still get MapPress search and filters.
Enter the ACF map field name in the Advanced Custom Fields setting (Frontend Forms section). Mashups then include the ACF locations of the matching posts.
Other Examples
Open a POI Using Javascript
You may need to open a map marker from your own code. If so, the method getPois() can be used to retrieve an array of a Map’s POIs, and the poiOpen method can be used to open them. For example, to open the second POI (number 1) on the first map (‘mapp0’), use:
const poi = mapp0.getPois()[1];
mapp0.poiOpen(poi);
You can also wait for a ‘mappress:ready’ event to know the map has loaded:
window.addEventListener('mappress:ready', e => {
  if (e.detail.name == 'mapp0') {
    // Do something with map named 'mapp0'
    const pois = window.mapp0.getPois();
  }
});